

Creating an online store can be challenging, but with the correct resources and direction, it can be a fulfilling and successful endeavour. Whether you’re a seasoned businessperson or are just getting started, setting up an internet store can help you expand your clientele and boost revenue.
We’ll walk you through the process of opening an online store in this post, from selecting an ecommerce platform to creating your website and introducing your first product. You’ll be well on your way to creating a profitable online store with the assistance of this thorough tutorial.
Table of Content
- 1. Select an ecommerce platform
- 2. Select your target audience
- 3. Select the products you want
- 4. Design your website
- 5. Integrate a payment processing
- 6. Select on a business structure
- 7. Prepare your store for launch
1. Select an ecommerce platform
An ecommerce platform enables you to create and launch an online store, generate revenue, and complete orders. Most people mistakenly believe that using an e-commerce platform is similar to creating a website; all you have to do is add new products and collect payments online. However, they are capable of much more.
To begin selling online with Shopify, click here.
When thinking about how to create a website for online sales, picture your ecommerce platform as the command centre for your entire company, managing everything from marketing to inventory and providing you with all the resources required to conduct online sales and offer customer service.
- Usability: Even if you are starting off by doing it yourself, your ecommerce software should be simple to use. To effortlessly develop your online store, look for a solution that uses a drag and drop online store builder. If you want to experience it for yourself, arrange a demo or free trial.
- Obtainable customer service: Look for a platform that provides assistance at every step. For instance, Shopify offers ongoing support as well as assistance with setting up your website or moving it from another platform. Support staff is available around-the-clock in 19 different languages by live chat, email, or even phone.
- No-hassle checkout: To increase sales, the checkout process must be simplified. Find an online storefront that makes it simple for customers to purchase your goods. Shop Pay speeds up online checkout if you’re using Shopify by a factor of four. Additionally, you can use Shopify’s plug-ins, which support more than 100 payment gateways and a range of payment options and currencies.
- Host a website: Your e-commerce website’s data and content are kept on a server database by your web host. For visitors to be able to access your online store, you need web hosting. While some e-commerce software comes with built-in web hosting, some demand that you use a third-party service.
Think about both your present and future needs when selecting your e-commerce software. Although some platforms might be the most effective option right now, a strong platform like Shopify can help you get started quickly and support your future growth.
Start a Shopify free trial today to create your online store using one of our expertly crafted templates. If you follow this advice and keep in mind that you can continue to add products and enhance your store after it goes live, the trial should give you enough time to create an online store that’s prepared to launch.
2. Select your target audience
The population on whom your marketing efforts are concentrated is known as a target audience. Knowing your ideal customer is essential when beginning an online store. It makes it simpler for you to acquire new clients and draws interested customers to your website, increasing conversion rates and boosting sales.
Depending on the kind of products you want to offer, you can create an audience of any size or characteristics. As a new entrepreneur in e-commerce, you should focus on these three primary areas:
- Demographics: Features such as age, gender, occupation, education, and income are included.
- Location: Groups that segment the market according to location, allowing you to better serve a particular region.
- Interests: Built on psychographics and contains your audience’s views, personalities, ideas, and way of life.
Selecting a target market is simpler if you already have a product. Consider this: Who purchases my product? How do they behave? What year are they? Create a buyer persona using this data, then integrate it in your business strategy. When writing the copy for your website and marketing efforts, you’ll need it.
If you don’t yet have a product, consider the types of people you are most familiar with. Perhaps you adore animals and have a deep understanding of other pet owners in their 40s and 50s. Most likely, you have a fair sense of their preferences, requirements, and worries. That group might be your intended market.
You need to actually know and value your audience if you want to sell online. Read Finding Your Ideal Customer: How to Define and Reach Your Target Audience for further guidance on figuring it out.
3. Select the products you want
Finding profitable things to offer is one of the main problems that business owners confront. It can be challenging to come up with product ideas, but if you have a target market in mind, you’re already ahead of the game. Fortunately, whether you’re manufacturing, reselling, or dropshipping, there are lots of options to find products to sell.
There are several approaches to locate profitable things to sell:
- Attract die-hard hobbyists.
- Follow your own passions.
- Take advantage of trends early.
- Take a look at what’s popular in online markets.
4. Design your website
You’ll need to get started with a Shopify free trial before we start. The trial should give you more than enough time to develop an online store that is ready for launch if you follow our guidance. Remember that even after your store launches, you may still add products and make improvements to it.
You will be asked to choose a store name when you begin your trial, and that name will serve as your default URL (for example, storename.myshopify.com). Don’t stress about choosing the ideal name right away; you can subsequently purchase a custom domain (such as yourstore.com), even though you won’t be able to change this.
You’ll enter your own Shopify account after responding to a few questions.
Here is a quick rundown of what you need to get started and what I’ll be using to open my store:
- A concept for a business. Since so many hot sauce companies claim to have “the hottest hot sauce ever,” I thought it would be entertaining to design a store called Kinda Hot Sauce as an example, which provides great-tasting moderate hot sauces for the semi-adventurous. You can look through our collection of small company ideas for inspiration if you don’t currently have a business idea.
- A company name. Before deciding on a business name, I utilised Namechk to see if the potential names were already in use on social media and as a domain. I chose kindahotsauce.shop as the domain because it can be difficult to find some.com domains. Not sure of the name of your store? Find out how to select a domain name or use the free domain name generator on Shopify.
- A logo. This logo, which I created in collaboration with a designer for a “challenger brand” that sells mild hot sauce, is clever, cunning, bold, and spicy. In order to make it easier to resize it without sacrificing quality, I generated a.png file with a transparent backdrop. You can use our instructions to make your own logo for no cost, or you can hire a designer.
- Photos. You may present your best self by using clean product photos. I’ll be using stock photographs for lifestyle photography as well as mockups of my hot sauce bottles on a white background. If you’re on a tight budget, you can take your own product photos, even with just a smartphone camera, or you can use free stock images while you wait to take your own distinctive lifestyle photographs.
(1). Add your products first
Why create an online store if there is nothing to purchase? Since your products will be the focus of the appearance and feel of your website, adding products should be one of your first tasks.
Go to Products > Add product in your new Shopify store to create your first product listing.
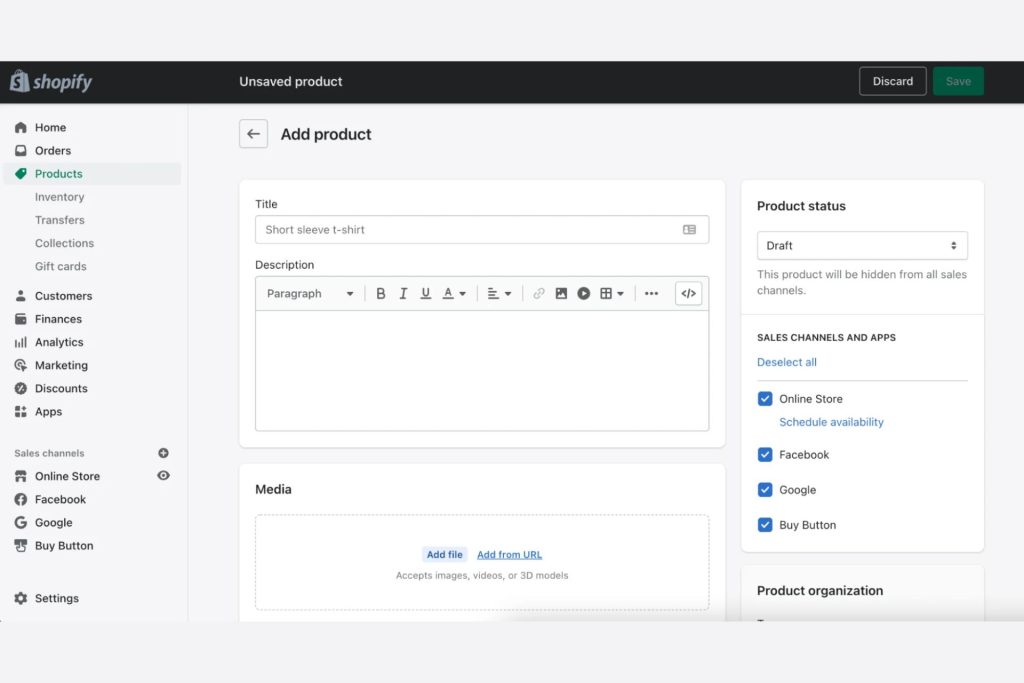
We’ll be making a lot of decisions on this page, so let’s divide them down into manageable steps.
Write the title and description of your product
Customers can learn more about a product on its product page before deciding whether or not to purchase it. The appropriate details, from cost to sizing, delivered in the right way, whether through text or images, can make all the difference. You might look at other websites in your market for ideas if you’re unsure of what to include while building your own online shopping website.
The description of your product should be included in the title. Customers will see this as they peruse your business, and it will aid them in locating the items they need in your catalogue. Keep it brief and highlight additional specific information or product options, such as colours or sizes, in your product description or variants (more on those later).
We’ll just use the name of our signature spicy sauce, spicy Enough Habanero, as the name of our first product.
Your product is described and sold in the product description. They frequently cause writer’s block as well. The good news is that anyone can write a strong product description; you don’t need to be a professional copywriter. All you have to do is:
- To whom you are speaking. Try to convey in your description what your buyer needs to know to feel confident purchasing your product.
- Highlight the rewards. Do you provide free shipping or a forgiving return policy? Are your items green in any way? Cut the fluff and focus on the features, advantages, and offers that are truly important. To swiftly express key selling aspects on their product websites, several stores use text and icons.
- Be prepared for frequent queries or objections. What might prevent a buyer from making a purchase? Do they worry about selecting the incorrect size? Do they need to be aware of the ingredients in your products in case they have allergies? Do they require proof that your goods are produced ethically?
- Text should be simple to scan. Use brief paragraphs, bullet points, subheadings, bolded language, etc. to make your descriptions easier to read. Then consider how quickly a visitor can access the data they require.
- Assist customers in visualising utilising your product. Your things cannot be tried on, tasted, felt, or touched by customers. Depending on your product, you can make your products come to life without using product images by describing the materials you use, giving a sizing chart, or telling the tale of how they were manufactured.
When purchasing a product like hot sauce, we can be sure that clients are concerned with the following specifics: ingredients, flavour, quantity, how spicy it is, and what it goes well with. Therefore, I’ve tried my best to make all of this information easily visible to customers of my store.
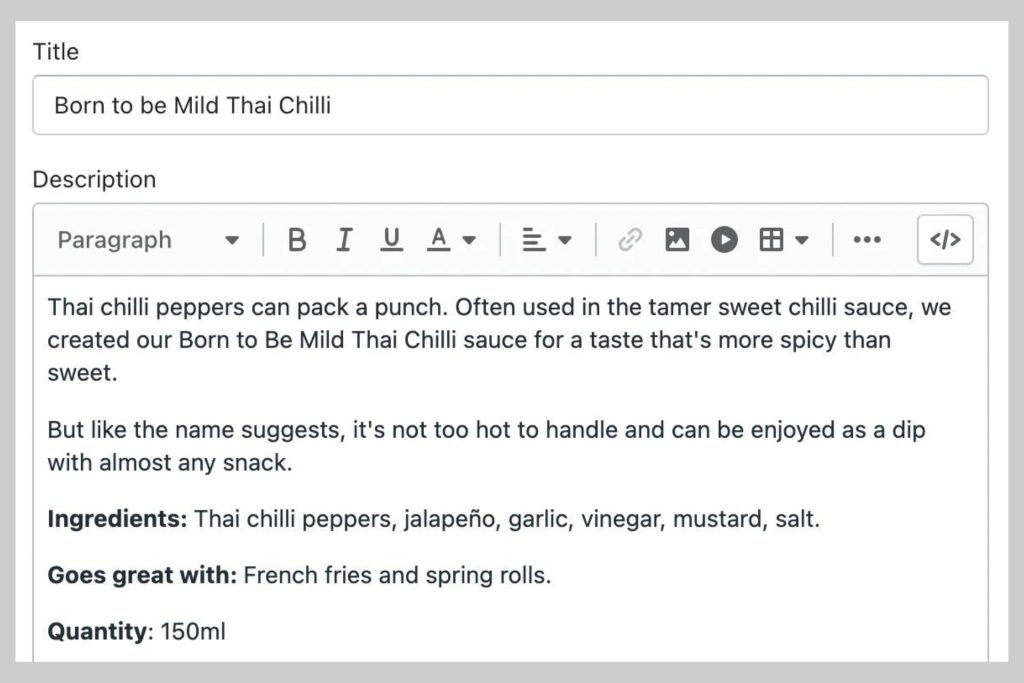
Post product images and media
You can submit any visual media—photos, GIFs, videos, even 3D models—that helps you convey more in-depth information about your items in the Media part of your product page.
The difference is all in the presentation. assist customers in visualising owning your product. Help them visualise it in use or displaying it with pride in their area. Here are some things to keep in mind:
Use photographs that showcase your products in the best possible way. Keep your photographs clear and high-resolution.
Try to keep your product photographs’ aspect ratios (the ratio between the width and height) consistent so that they all appear to be the same size. When you construct your online store, this consistency gives it a cleaner, more professional look.
If you’re on a tight budget, the majority of contemporary smartphones are capable of taking high-quality product images, which you can then edit for free using programmes like removebg, which helps you do so.
You can click on an image after you’ve uploaded it to make simple modifications like cropping and resizing. Altering the Alt Text will make your photographs more accessible to those who cannot see them. To assist anyone with a vision handicap who wants to buy with me, I’ve typed “a 150 ml bottle of Hot Enough Habanero by Kinda Hot Sauce” as an example.
I’ll be using a solitary image of a white background and a bottle of hot sauce. However, adding numerous photographs that provide extra angles or features for things like apparel or jewellery where the client might need more visual information can assist increase customer trust.

You set the price
Setting the listing price for your product is now necessary. Customers will spend this amount to purchase your product.
In the event of a sale, you can optionally utilise the Compare at price field to specify how much the item would normally cost. For instance, we might put the original cost of the three bottles of hot sauce in this field to demonstrate savings from purchasing the three-pack. However, I advise avoiding doing this if you don’t have to, especially if you’re selling expensive goods because it might devalue the perceived quality of those goods.
The field labelled “Cost per item” is also optional. You can use it to keep tabs on your profit margin for a certain product if you’d like. This allows you to track profit in your profit report if you have a Shopify plan or higher.
Establish collections based of your products
As soon as we have at least a few individual products displayed, we can begin putting them into collections in Shopify by going to Product > Collections.
To curate products for a particular audience (such as children’s products), a topic (such as bestsellers), or a product category (such as accessories), collections can be made. You can choose whether you want to manually add items to specific collections or automate what is included and what is omitted based on factors like price, tags, and other factors.
Collections can be used for a number of things, including:
- Selecting specific items to display on a part of your homepage.
- Including links to product groupings in your navigation or on your homepage will make it easier for diverse audiences to traverse your catalogue.
- Curating the products you want to put on sale (you can give discounts to certain product collections).
(2). Create important pages for your store’s online business.
Our attention has thus far been on products. But when you build your own online store, you need more than just products. It must aid customers in comprehending your company, inspire confidence in them, and make other crucial information accessible to those who are looking for it.
The majority of these pages can be created by going to Online Store > Pages.
Even though not every page needs to be completed before launch, the following are some of the most useful ones:
- Contact page. This page provides clients with clear contact information in case they have inquiries or directs them to a resource where they can get answers, such a FAQ page.
- About page. An about page establishes a personal connection with clients, clarifies your business strategy, and/or provides the inspiration behind your venture. When creating your online store, bear in mind that a strong About page can go a long way towards helping new brands get credibility.
- FAQ page. Some of the more frequent customer service questions are alleviated by a frequently asked questions page.
- Policy pages. Customers anticipate certain legal pages, such as your privacy policy and return policy, which you can set up under Settings > Legal. These pages can also assist to defend you in the event of a disagreement.
About page
As you build your online store, about pages are a terrific way to embrace the “small” in small business and gain credibility as a new vendor.
You can include a video on which you introduce yourself as the founder, links to recognition in the press and awards, pictures of your supply chain, or anything else that will assist your visitors understand who you are and what you stand for.
Privacy policy rules
For online businesses, having policy pages is normal procedure. They provide a location for your clients to learn about your practises and what they may anticipate from you. They also assist in defending you in the event of a consumer dispute.
- Rules for returns policy: What are your policies on exchanges and returns? How much time do consumers have to start a return? What state does the item have to be in? Customers can buy from you with confidence if you have a welcoming return policy.
- Privacy guidelines: How you gather consumer data is described in a privacy policy.
- Conditions of use: A contract defining how you will do business and the rights you reserve is known as your terms of service policy.
- Shipping regulations: Setting consumer expectations about shipping prices, production lead times, and delivery periods for the areas you ship to is facilitated by a shipping policy.
(3). Create a fully customised web store
It’s time to head over to Online Store > Themes in Shopify and start considering how we want our website to appear now that we have some products in our store and some pages ready to go.
Select a theme
Selecting a theme is the first step in creating your own online store. A theme is a template that we install in our site and can be used as a design starting point. Both free and paid themes with unique designs and functionalities can be found in the Shopify Theme Store.
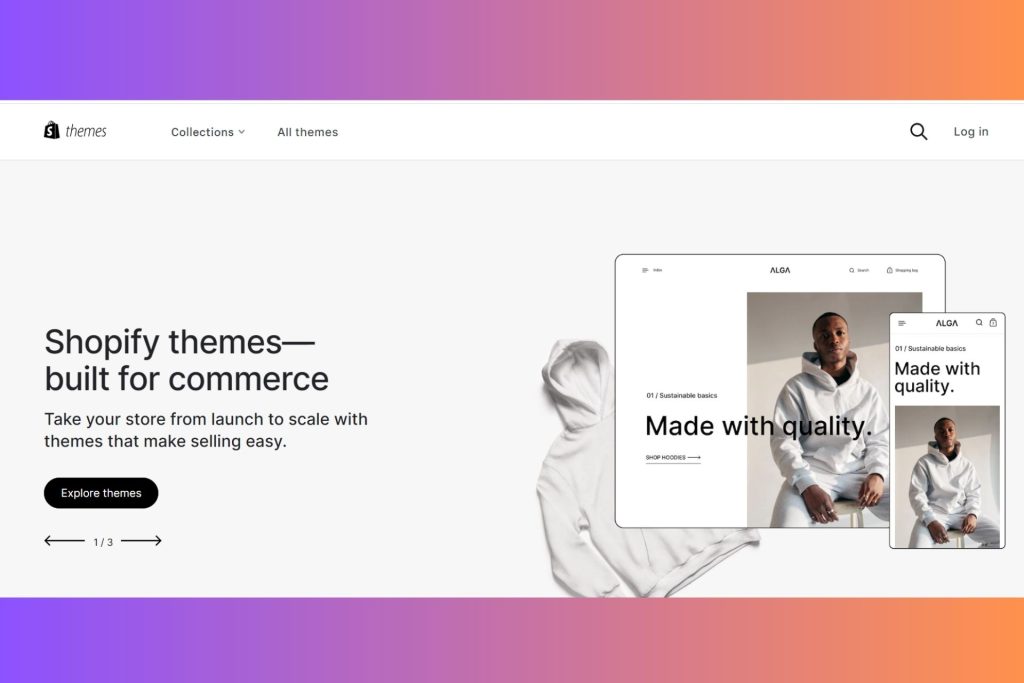
It’s crucial to choose a theme for your Shopify store. The general appearance and feel of your store, as well as the features that are available, will be based on the theme you select.
When picking a topic, bear the following in mind:
- Your brand: Your brand’s identity should be reflected in the theme you select. When selecting a theme, take into account the hues, fonts, and general style of your company.
- Your product: Additionally, the theme you pick should fit the kinds of goods you sell. For instance, you should pick an attractive and refined motif if you sell expensive jewellery.
- You need: Consider the attributes your shop needs. Does one exist for you? Do you intend to market various goods? Are you in need of a responsive theme?
Design Your Own Homepage
The sections that make up each theme can be moved around, added to, taken away from, or temporarily hidden. You can experiment with alternative layouts and make decisions about how your store’s homepage will be presented using sections.
Consider the objectives that a homepage should achieve and consider how they relate to your particular business when choosing your homepage design.
- Give new customers priority and make sure they comprehend your company’s mission and products right away.
- Allow recurring visitors and make it simple for them to find the products and pages they want to see.
- With each scroll, work to increase consumer interest in your offerings and business credibility.
- Based on their desire to make a purchase, create clear paths for your visitors to follow. You may draw attention to your About Us page so people can learn more about your company, or your different collections so customers can choose the things they wish to see.
- Assume that many of your visitors will be viewing your homepage on mobile devices when designing it.
Custom your own checkout
You can also alter how your checkout appears under Theme Settings. To give your checkout a branded feel, it’s a good idea to at the very least put your logo.
By accessing your checkout settings (or heading to Settings > Checkout), you can alter how your checkout functions if necessary.
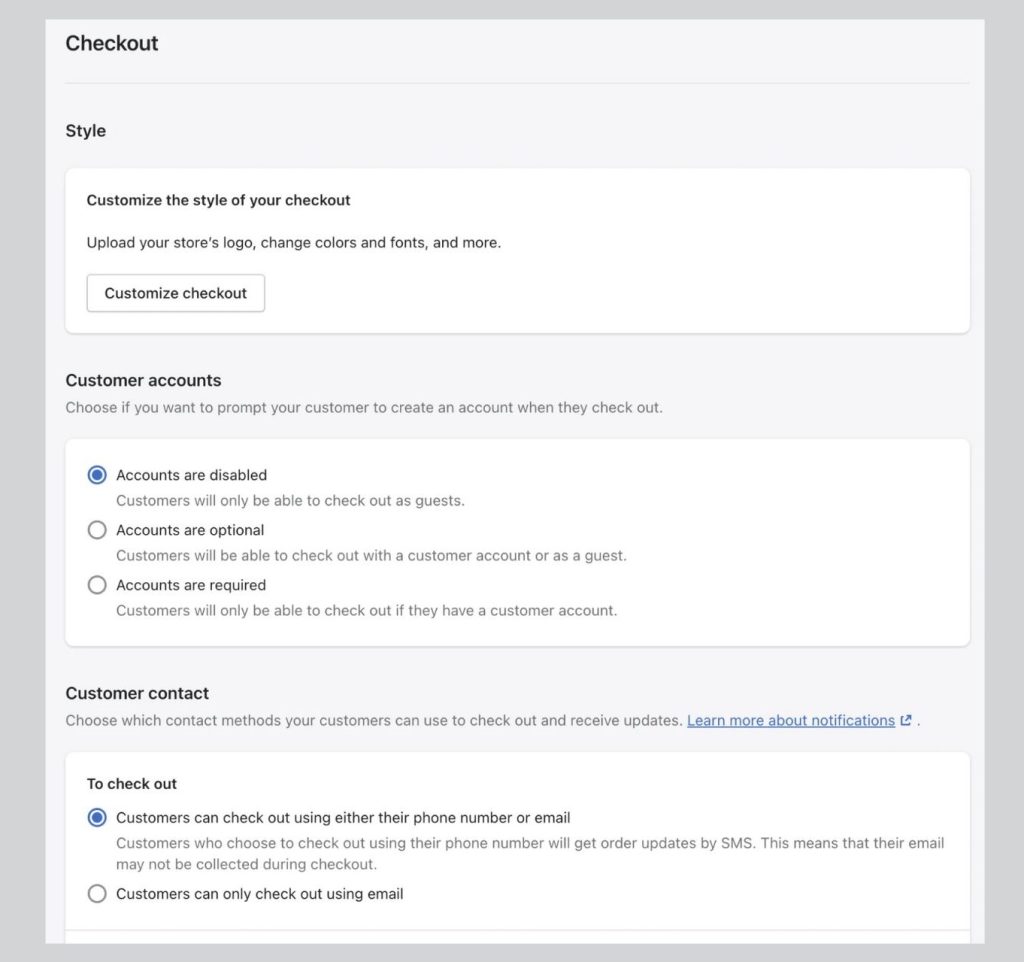
By accessing your checkout settings (or heading to Settings > Checkout), you can alter how your checkout functions if necessary.
- Accounts for clients. You can decide whether or not you want clients to register during the checkout process. If you manage a wholesale or members-only store, this may be helpful. Since we don’t want to add extra friction to our checkout process, we’ll disable it for our store.
- Client interaction. Customers can specify whether they wish to receive emails or SMS text messages from you after placing an order. To keep things simple and concentrate on growing an email list I can market to, I’ll choose “Customers can only check out with email” for the time being.
- Form choices. Here, you may choose whether additional details like a first name or business name are concealed, optional, or necessary throughout the checkout process.
- Processing orders. Options to speed up the ordering procedure or include an additional confirmation step are available. We’ll allow address autocomplete and utilise the customer’s shipping address by default as the billing address to save clients some time.
Ask for reviews
Reviews is a blessing, especially after investing a lot of time in developing your own online store. New eyes can frequently see areas for improvement that you miss and offer priceless insights you can use to make adjustments to your store.
Your store is password-protected by default, but you can allow visitors to browse it by providing the password. Your password can be found (or modified) by going to Online Store > Preferences.
Other excellent locations to seek advice are as follows:
- People you can trust to provide you with honest, constructive criticism.
- Facebook groups that your target audience might join on Reddit.
- Feedback from the Shopify Community on My Store Forum.
(4). Establish shipping
One of the trickiest factors to manage when running an online store is shipping. There are several factors to consider, including product weights, packaging expenses, shipping locations, carrier rates, and your potential profit per order.
Fortunately, we can reduce it to a few key strategies, which you can even combine to build a shipping plan that works for you based on the particular demands of your company:
- Offer free delivery. Whether it’s applied to specific products, order amounts (for example, if they spend over $50), or geographical locations, free shipping can be a useful incentive for customers to buy with you. If you intend to cover the cost of shipping on behalf of your consumers, keep in mind that you will need to include this in the retail price of your products.
- Use current carrier rates. To produce shipping alternatives and real-time pricing, Shopify interfaces in real-time with a number of carriers, including USPS and Canada Post. Your consumers will be able to select the precise service and pricing they desire as a result. Shopify Shipping offers lower rates that you can use.
- Set a fixed price. When your products are similar in size and weight, flat-rate shipping is most effective because it makes it easy to forecast how much actual delivery will cost.
5. Integrate a payment processing
We’re down to the last bit now! Choosing your store’s payment options and how you, the store owner, will be paid comes next.
To configure your payment provider, go to Settings > Payments. With Shopify Payments, it’s simple to start accepting all major payment methods.
Shopify Payments may be activated with just one click, and there are no additional transaction fees to pay as long as your business is run in one of the supported countries and is not regarded as a prohibited enterprise. Offer your consumers extra payment alternatives, such as PayPal, or pick from over 100 third-party payment providers available here.
6. Select on a business structure
You’ve now completed all the enjoyable steps involved in opening an online store, including naming your business, creating your website, locating products, and creating product descriptions. However, you must make your new company legitimate before you begin operations.
Though it’s not the most enjoyable step, incorporation is a requirement for your company. If something goes wrong, your personal assets are also protected by a legally valid organisation recognised by the government. It also facilitates:
- Perhaps have your tax bill reduced.
- Easily obtain company capital.
- Make retirement strategies.
- Keep your personal score separate from your credit rating.
7. Prepare your store for launch
We could actually open our business right now if we wanted to, given the amount of work we’ve already done. The final step to flip the open sign and allow people to enter and begin purchasing our stuff is to simply disable the password protection under Online Store > Preferences.
In fact, if you need to go live right away, you can skip some or all of the next steps and come back to them later.
But in this tutorial, I’m going to make sure that my store is in a good position for me to start marketing, as well as making a strong first impression and providing a positive consumer experience at launch.
Following that, the following are the steps we’ll cover in detail:
- Adding a custom domain
- Setting up appropriate sales channels
- Changing the email/SMS notifications you receive (Optional)
- Establishing monitoring and analytics for your store
Final Thoughts
Launching an ecommerce business is an exciting opportunity to turn your ideas into a successful online store. However, building a profitable business takes more than just choosing products and setting up a website. You need to understand your target audience, create a smooth shopping experience, choose the right marketing strategies, and build trust with your customers. Every step plays an important role in helping your store grow.
Remember, you do not need to have everything perfect from day one. Start with a clear business plan, focus on your customers’ needs, and keep improving your store based on their feedback and performance. With consistency, smart decisions, and the right tools, you can turn your ecommerce idea into a strong online business and create opportunities for long-term growth.
Join us as you begin your Shopify journey
We are e-commerce specialists and Shopify Partners. Get in touch with us if you need assistance with Shopify, need a whole website built, or have any other general questions.